Introduction
In this blog, we explore MuleSoft Snowflake integration by first understanding the Snowflake cloud database, then walking through the steps to create a Snowflake trial account, and finally demonstrating how to integrate a MuleSoft application with Snowflake. The walkthrough includes a practical example of performing CRUD operations.
What is Snowflake?
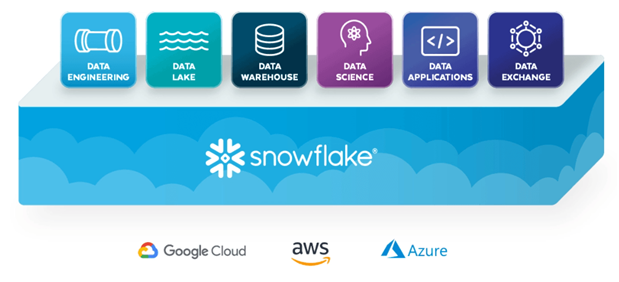
Snowflake is a cloud-based data warehousing platform delivered as software as a service. It enables organizations to store, process, and analyze large volumes of data using cloud infrastructure.
Snowflake operates on major cloud providers such as Amazon Web Services, Google Cloud Platform, and Microsoft Azure. It functions as a fully managed relational database management system built specifically for the cloud. Additionally, Snowflake complies with ACID principles and supports standard SQL.
Snowflake supports a wide range of enterprise use cases, including data integration, business intelligence, advanced analytics, and security and governance. Moreover, it provides SDK and driver support for programming languages such as Java, .NET, Go, and others, which makes integration with enterprise platforms straightforward.
Steps to Create Snowflake Account Setup
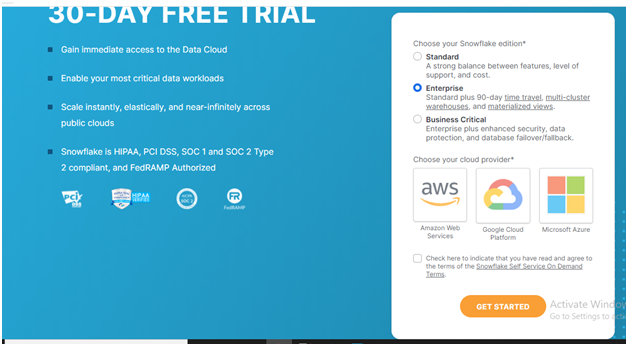
To begin the MuleSoft Snowflake integration, create a Snowflake trial account. Start by signing up directly on the official Snowflake website. To create the Snowflakes trail account Click Here.

After entering the required details, click Continue and select the preferred cloud provider, such as AWS, GCP, or Azure. Next, activate the account using the activation link sent to the registered email address.
After you activate the account, log in using the provided credentials. At this point, Snowflake creates an instance with a unique account identifier, which appears in the URL after you log in.
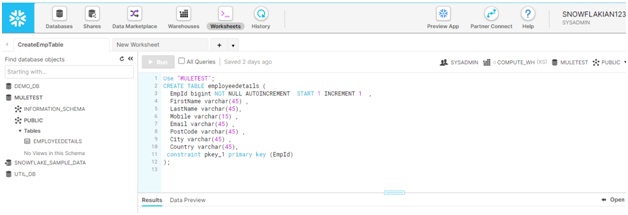
Next, create a database from the Snowflake home page. Then, create a worksheet to run SQL commands and perform database operations such as create, insert, update, and delete.
Using the worksheet, create an employee table by running the appropriate SQL query.
Procedure
Connecting Snowflake Database with Anypoint Studio
To integrate MuleSoft with Snowflake, start by creating a new MuleSoft project in MuleSoft Anypoint Studio. Then, create a simple flow using an HTTP Listener component to accept incoming requests.
MuleSoft connects to Snowflake using the Database connector with a generic connection configuration. All database module components are compatible with Snowflake when the appropriate JDBC driver is configured.
To enable connectivity, add the Snowflake JDBC dependency to the project pom.xml file:
  <dependency>
    <groupId>net.snowflake</groupId>
    <artifactId>snowflake-jdbc</artifactId>
    <version>3.12.16</version>
  </dependency>
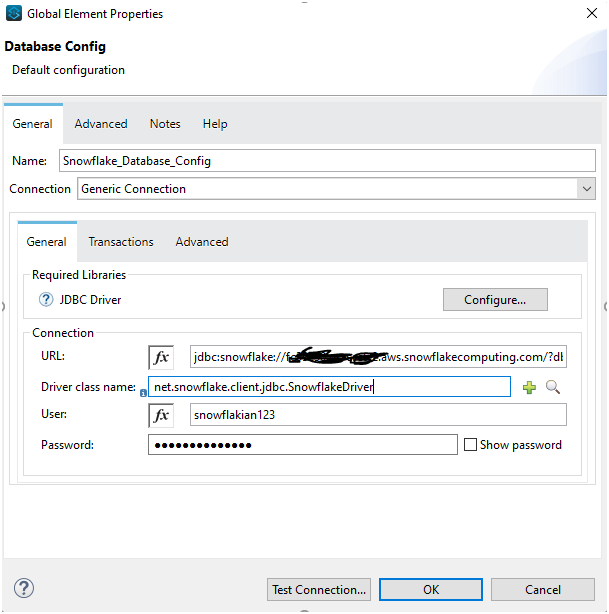
Next, configure the Database module with the following details:
-
- Connection type: Generic Connection
-
- Connection URL:
jdbc:snowflake://<account>.snowflakecomputing.com/?db=<database>&schema=public
- Connection URL:
-
- Driver Class:
net.snowflake.client.jdbc.SnowflakeDriver
- Driver Class:
-
- Username: Snowflake account username
-
- Password: Snowflake account password
After entering the configuration details, test the connection. If the configuration is correct, a success message confirms that MuleSoft can connect to the Snowflake database.
Creating the Integration Flow
Once the database connection is established, create a MuleSoft flow that includes a Transform Message component. This component converts the incoming payload into JSON format and applies any required transformations before inserting data into Snowflake.
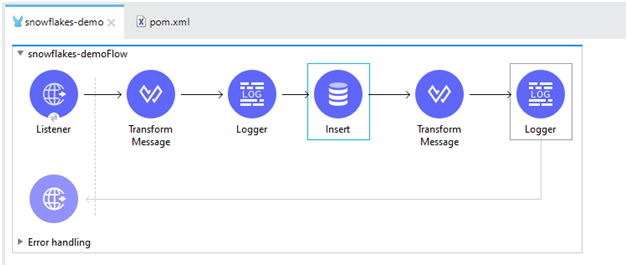
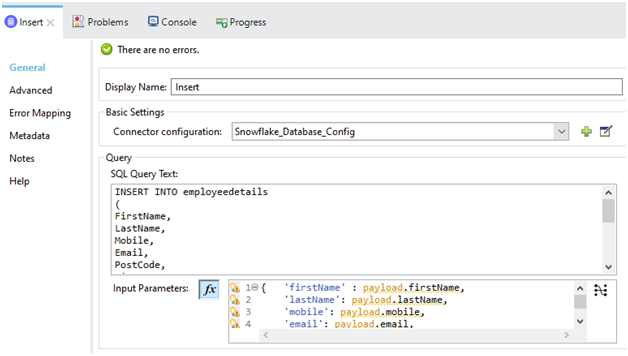
Next, configure an Insert operation using the Database connector. Write the SQL insert query with named parameters and map the request payload fields to the corresponding query parameters.
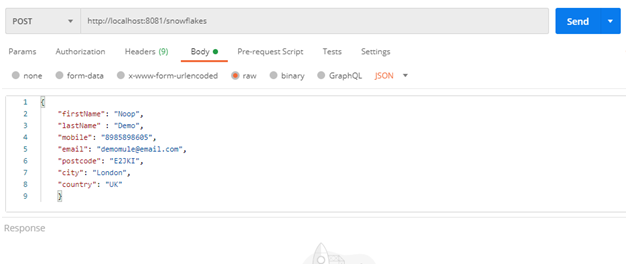
After completing the configuration, send a POST request from a client application such as Postman to insert data into the Snowflake table.
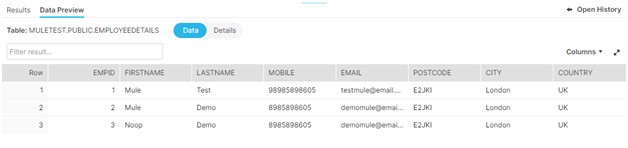
If the request executes successfully, the data is inserted into the employee table. The results can then be verified by previewing the table data directly in the Snowflake worksheet.
Conclusion
This walkthrough demonstrates how a MuleSoft application can successfully integrate with a Snowflake cloud database to perform core database operations. By using the MuleSoft Database connector with the Snowflake JDBC driver, teams can establish secure and reliable connectivity while maintaining full control over data flow and transformation logic.
Moreover, this integration approach helps organizations modernize their data architecture and streamline analytics workflows. As a result, teams can support scalable data operations, improve system interoperability, and lay a strong foundation for broader initiatives such as MuleSoft migration and cloud data platform modernization.