Introduction
The Connected Apps feature enables external applications to integrate with the Anypoint Platform using APIs secured through OAuth 2.0 and OpenID Connect. As a result, organizations can avoid sharing sensitive credentials. This Connected Apps integration approach enables secure, scope-based access to Anypoint Platform resources without exposing sensitive credentials.
With Connected Apps, end users can explicitly authorize applications to access specific Anypoint Platform data. Therefore, administrators retain full control over permissions. Administrators can find this feature under Access Management in Anypoint Platform.
In this blog, we explore the Connected Apps feature in detail and walk through step-by-step demos covering common integration scenarios commonly delivered through MuleSoft integration services.
Connected Apps focus on three primary user roles:
-
- Organisation Administrator
-
- Organisation Administrator developing a Connected App
-
- End User
In summary, Connected Apps provide the following benefits:
-
- Connected App usage remains fully tracked and auditable
-
- Administrators can revoke granted access at any time
-
- Revoking access does not require users to reset or change passwords
Demo and Walk-through
The following demo walkthrough illustrates how Connected Apps integration works in real-world Anypoint Platform authentication scenarios.
Method 1 – App Acts on Its Own Behalf (Client Credentials)
-
- Sign in to Anypoint Platform using valid credentials.
-
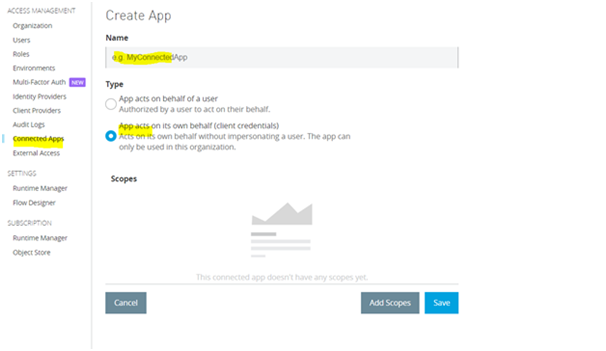
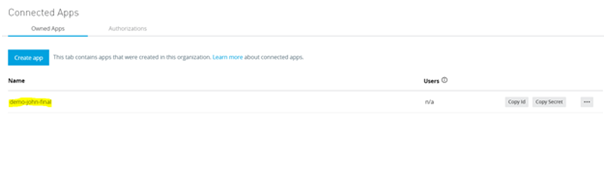
- Navigate to Access Management and select Connected Apps. Under the Owned section, click Create App.
-
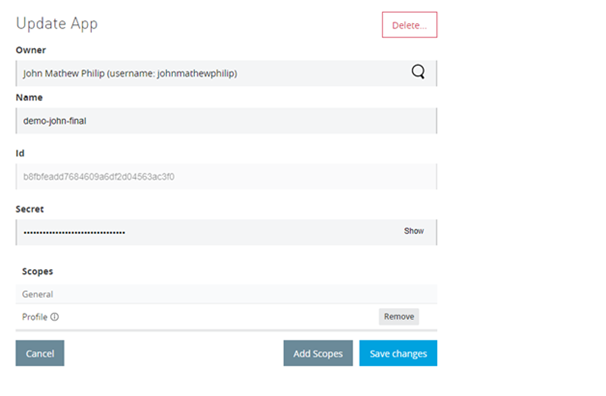
- In the configuration window, provide an application name and select the option App acts on its own behalf (client credentials).
-
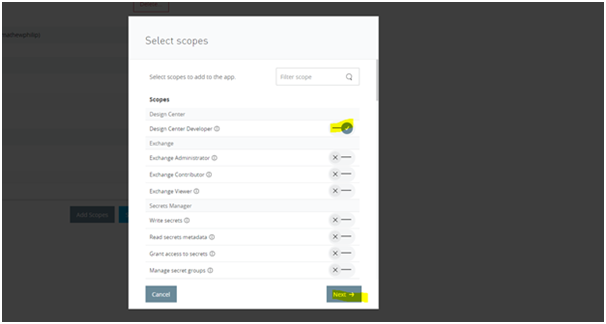
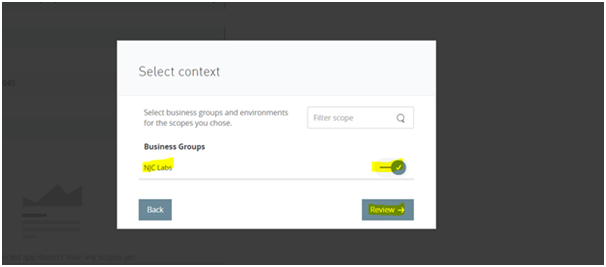
- Click Add Scopes and select the required scopes for the application. Choose the appropriate environments and organization if prompted, then click Review and add scopes. For this demo, the Design Center Developer scope is selected.
-
- After saving the configuration, verify that the application appears in the Connected Apps section.
-
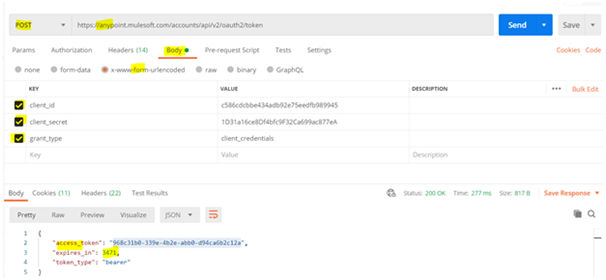
- Open a client application such as Postman or Advanced REST Client and generate a bearer token using the client ID and client secret of the Connected App.
-
- Next, copy the generated bearer token. This token will be used in the Authorization header when accessing API endpoints.
-
- Select an API endpoint that aligns with the configured Connected App scope. In this case, the Design Center Developer scope applies.
-
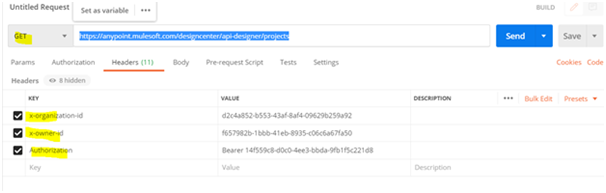
- For this demo, use the endpoint:
https://anypoint.mulesoft.com/designcenter/api-designer/projects
This endpoint returns all projects available in Design Center and matches the previously selected scope.
- For this demo, use the endpoint:
-
- Paste the endpoint into Postman or another client tool and populate the required parameters. Set the Authorization header with the bearer token.
-
- Execute the request. A successful response returns a 200 status code along with the project data.
-
- To validate scope enforcement, remove the previously assigned scopes and attempt to invoke the same endpoint again.
-
- The request now returns a 401 Unauthorized status code, confirming that access has been revoked based on scope restrictions.
Method 2 – App Acts on Behalf of a User
-
- Navigate to Access Management and select the Connected App.
-
- Next, choose the grant type. For this demo, select Authorization Code.
-
- Use Postman as the redirect URI source platform.
-
- Set the redirect URI to:
https://oauth.pstmn.io/v1/callback
- Set the redirect URI to:
-
- Provide the application website URL or a placeholder web address.
-
- Select who can use the application, either all Anypoint Platform users or only members of the organization.
-
- Click Add Scopes and select the required scope. For this demo, choose View Environments.
-
- In Postman or another client tool, select an endpoint that aligns with the chosen scope:
https://anypoint.mulesoft.com/accounts/api/organizations/{orgId}/environments
- In Postman or another client tool, select an endpoint that aligns with the chosen scope:
-
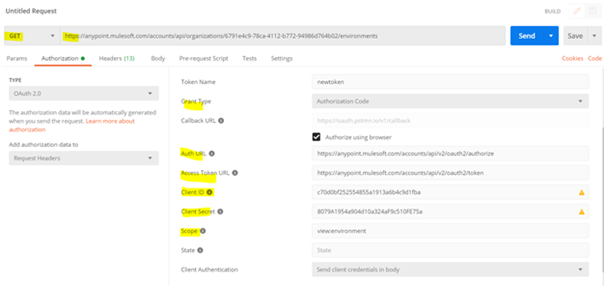
- In the Authorization tab, select OAuth 2.0 and provide the following details:
-
- Token Name: Any descriptive name
-
- Grant Type: Authorization Code
-
- Enable Authorize using browser
-
- Client ID and Client Secret: From the Connected App configuration
-
- Scope: Use predefined scope keywords. For this demo, specify view:environment
-
- In the Authorization tab, select OAuth 2.0 and provide the following details:
-
- Click Get New Access Token. A browser window opens, prompting authentication with the Connected App name displayed. Sign in using Anypoint Platform credentials and allow access.
-
- Click Use Token and execute the endpoint request. A successful response returns a 200 status code. Attempting to access endpoints outside the authorized scope results in a 401 Unauthorized response.
Conclusion
Connected Apps provide a secure and controlled mechanism to grant external applications access to Anypoint Platform resources. By using OAuth 2.0 and fine-grained scopes, organizations can expose specific capabilities while maintaining strong governance and auditability.
This feature supports scenarios where access must be restricted to defined scopes, whether the application operates independently or on behalf of a user. Additionally, Connected Apps integrate seamlessly with front-end applications to enable advanced use cases such as asset publishing, environment access, and application deployment. Further capabilities, including publishing assets to Exchange and deploying applications to CloudHub, will be covered in future blog posts.