Introduction
When setting up VPC and VPN in Anypoint Platform, understanding the core features of MuleSoft’s CloudHub is essential. In general, CloudHub operates as a multi-tenant integration platform in the cloud, enabling organizations to deploy and manage APIs at scale. With this in mind, CloudHub Virtual Private Cloud (VPC) allows teams to create a virtual, private, and isolated network segment on AWS to host CloudHub workers securely. As a result, VPCs, as part of CloudHub’s managed services, support deploying, running, and managing applications in a dedicated environment designed for enterprise-grade security and reliability.
Similarly, VPN stands for Virtual Private Network and Anypoint VPN creates a secure connection between CloudHub and Customer networks. In this blog, we will explore how to set up VPC and VPN in Anypoint Platform, thereby establishing a critical foundation for secure integrations, high availability, and long-term MuleSoft application support in enterprise environments.
Walkthrough: Setting Up VPC and VPN in Anypoint Platform
Steps to create VPC:
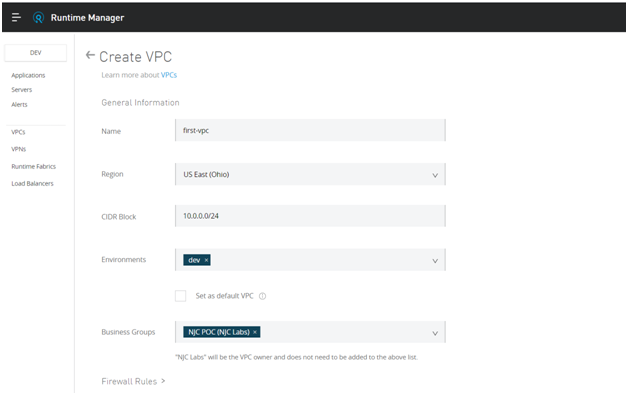
- First, in your Runtime Manager, click on the VPCs and create VPC.
- Name the VPC and then choose a region closest to your data centre.
- After that, give the CIDR block size and range for the VPC. Anypoint VPC supports CIDR block sizes from 24 (256 IP addresses) up to 16 (65,536 IP addresses).
- Then, choose the environment and the business group.
Configuring Firewall Rules for VPC
- At this stage, configure the firewall rules. MuleSoft provides four default firewall rules. Custom firewall rules allow you to define specific IP ranges and ports.

- Once completed, click on create VPC


Creating VPN in Anypoint Platform
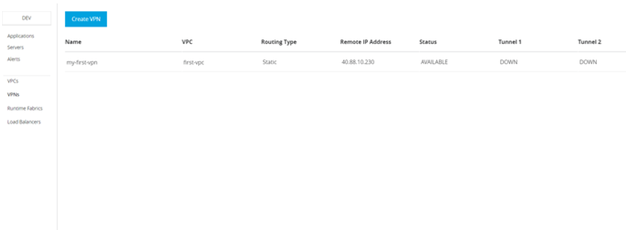
- Now go to VPN and click on create VPN

- Name the VPN and choose the VPC from the dropdown.

- Use the Remote IP Address from the Azure resource you create.
- First sign in to Microsoft Azure portal. (You can use the trial version for this walkthrough) https://portal.azure.com/
- Then, create a resource group. In simple terms, a resource group is a container that holds related resources for an Azure solution. For example, it can include all resources for a solution or only those you want to manage as a group.


A resource group is a container that holds related resources for an Azure solution. The resource group can include all the resources for the solution, or only those resources that you want to manage as a group. 


Creating and Accessing the Azure Resource Group
- Open the resource group.

- Next, add a new Virtual Network and click on create. The resource group and region will come by default. Click on create and review and then create.


- Following that, create a virtual network gateway. Give a name to the gateway and one for the Public IP address. And also choose the virtual network from the network. Once you click create, Azure takes some time to generate the Public IP address. Use the same IP address as the Remote IP address when creating the VPN.


In technical terms, a virtual network gateway deploys two or more VMs into a specific subnet that you create, known as the gateway subnet. 


Generating the Azure VPN Gateway Public IP
- Once available, copy the public IP address.

- Afterward, to get the value of CIDR, go to the Virtual Network created, click on the subnets in the left palette. The system displays the Default and Gateway subnets.
Then, copy the default subnet value and paste as the CIDR.


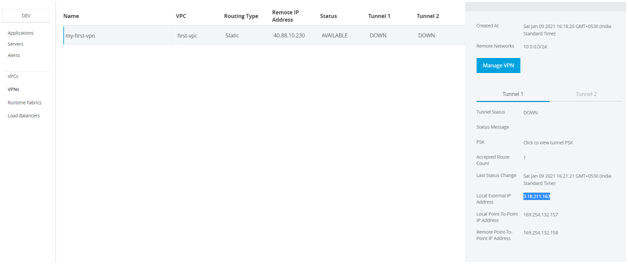
- Initially, the status, tunnel1 and tunnel2 will be PENDING. If successful then status will become AVAILABLE and tunnel1 and tunnel2 will be DOWN. If failed, both the tunnels would be pending and the status will be failed.


- To bring the tunnels UP, create Local Network Gateway for both the tunnels separately. For each gateway, provide a name, use the Local external IP address from Tunnel 1 in Anypoint Platform, and set the Address Space as the VPC CIDR.
In this context, a local network gateway is a specific object that represents your on-premises location (the site) for routing purposes.
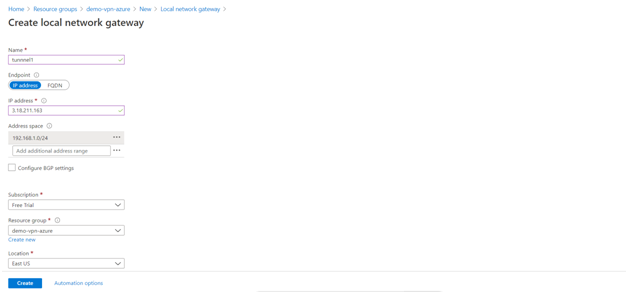
- After completing Tunnel 1, repeat the same steps for Tunnel 2.

- Next, go to the Virtual Network Gateway and select Connections. Then, give a name for the connection and set the connection type to site-to-site IPsec. After selecting the local network gateway from the dropdown, copy the Shared PSK Key from the respective tunnel in Anypoint Platform. Finally, create connections for both tunnels.


- Once both the connections are made perfectly then both the tunnels will be UP.


Our task is completed. We have now successfully configured VPC and VPN (azure cloud) in the Anypoint Platform. Hope this helps you.
References
- https://blogs.mulesoft.com/api-integration/security/isolate-your-worker-instances-using-a-vpc/
- https://docs.microsoft.com/en-us/azure/vpn-gateway/tutorial-site-to-site-portal#:~:text=The local network gateway is,the site) for routing purposes
- https://docs.microsoft.com/en-us/azure/vpn-gateway/vpn-gateway-about-vpngateways